New Holiday Product- Festive Flurry

Festive Flurry Stamp Set and Framelit Die

Have you seen this in the 2013 Holiday Catalog?

I have purchased mine but I have not had a chance to play with it yet. I hope to soon and show you what I have done with it.

Come check out this Stampin’ Up! video showing one idea.

Available: August 1,2013 – January 2, 2014

Product Item # 133284 wood $ 54.95 *or 133285 clear $46.95*

*At a 15% savings when you order the bundle plus tax and shipping.(The bundle includes the stamp set and the framelit die, these can also be purchase separately)

These are great for making gorgeous snowflakes to send winter greetings, dress-up your packages or even trim your tree.

New Arrival- THINLITS Card Dies!

LPHeader_thinlits_Demo_7_19_13

They’ve been called flip cards, flip flop cards, swing cards, and more-but they have always been a bit tricky to create. Not anymore! Our amazing new Thinlits Card Dies cut and score to create a card that flips in just one step.

VIDEO TUTORIAL – HOW TO MAKE:

 ITEM # TO ORDER AND PRICE:

Screen-Shot-2013-08-01-at-9_42_53-AM1

Coordinating Product Ideas:

The main shape in the cards (circle and label) can work with a lot of our stamp images so you can create tons of different kinds of cards using many different stamp sets. Here are just a few suggestions to get you started:

Label Card Thinlits Die (item 133479):

  • Happy Day Stamp Set (item 130294 W item 130297 C)

Circle Card Thinlits Die (item 133480):

  • Worth the Wait Stamp (item 131094 W)
  • Five-Way Flower Stamp (item 131088 W)

Both card dies pair well with:

  • Oh, Hello Stamp Set (item 131931 W item 130733 C)
  • Yippee-Skippee! Stamp Set (item 131341 W item 131344 C)
  • Really Good Greetings Stamp Set (item 130330 W item 130333 C)
  • Regarding Dahlias Stamp Set (item 130324 W item 130327 C)

I love these! I really like cards that move, pop out or shake, I can’t wait to mine!

Oh Hello Double Spinner Card

Today’s inspiration was made for the Blooms and Butterflies Challenge (BB-6).

The colors used are: Wisteria Wonder, Soft Sky, and Sahara Sand

Oh Hello- Double Spinner Card

This card has 2 double spinners that move, how fun is that!
Making pinwheel

How to make a Pinwheel

Starting with a square (any size you prefer),then cut starting at the tip of the corner and cut to the center about  1/3 to halfway up . I  placed a glue dot in the center and folded in every other flap to the glue dot. Instead of using the glue dot you could also use a brad to keep them together.

Oh Hello-Double spinner pinwheel

To make the pinwheel shown, I started with the wisteria wonder cardstock and stamped the image from the OH Hello stamp set. Then cut my square at 1 1/2″ x 1 1/2″ . Assembled my pinwheel and finished it off with a button and pearl.

Pinwheel stopper

How to make it spin:

I used the oval framelits to cut out the cardstock and affixed my pinwheels to nickels and placed inside.  In order for them to spin at the top and bottom I used a “stopper” in the middle.

Sizes:

Base card cut 8 1/2″ x 5 1/2″ scored at 4 1/4″

Layers: Outside layer :4th oval framelit, Center :1st oval framelit. Trim: 1st and 2nd together, 3rd & 4th together.

Supplies Used for the Oh Hello Spinner Card

To see the rest of the design team click here

Thanks for stopping by today and I hope you have a wonder day!

Shaker Card For You

Today’s card was made from inspiration using the Blooms and Butterflies color challenge and watching the 2013 Stampin’ Up! Convention.

The colors used are: Chocolate Chip, Soft Sky and Wild Wasabi

For You-shaker card

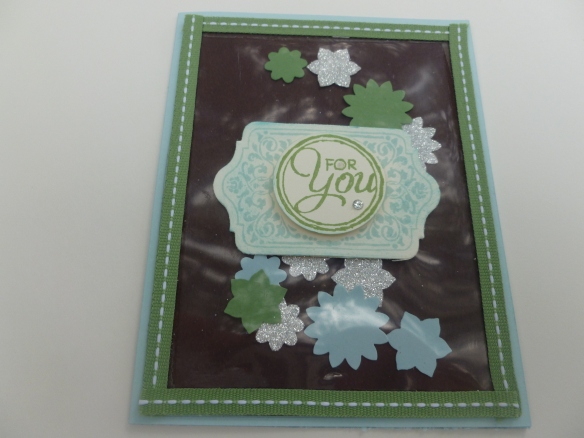
Watching the opening ceremony for the convention they demonstrated a shaker card using the Washi Tape, which happens to be on my wish list.  So I decided to switch it up and use what I do have.  This card is super fun to put together. When you pick it up and shake it the parts move inside, Fun!

DIMENSIONS:

Card size: 5 1/2″ x 4 1/2″ : Layers: Chocolate Chip and Window Sheet are both cut out at 5″ x 4″ Other parts: Punched out & I used the Chalk Talk Framelits (you could cut out with scissors if you don’t have).

PUTTING IT TOGETHER:

Cardstock & window sheet

Step 1: Using chocolate chip and the window sheet, I used Sticky Tape and placed the tape on all 4 sides the chocolate chip paper and removed 3 sides of the film cover from the sticky tape to adhere the window sheet on top. (Note: leave the 4th side covered otherwise you can’t get your goodies in, I also used less on this side so I can get the film cover off.)

Cardstock with Sticky Tape

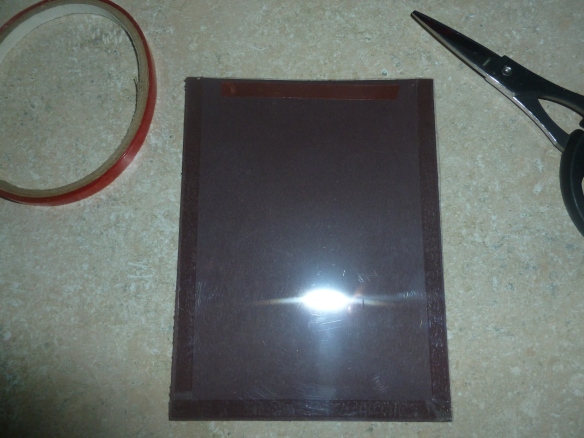
Step 2: Punch out your items you want inside to shake,(you could use an array of items inside).  Add the pieces inside.

Step 3: Remove the film cover off the sticky tape on the 4th side to seal.

Step 4: Use sticky tape or snail on the outside of the window sheet on all 4 sides and cover with ribbon.

Step 5: Finish by attaching the layer, sentiments, images and any embellishments and attach to base card.

Note: If you do have washi tape then it’s even easier.  Start with colored cardstock and lay the window sheet on top. Apply washi tape on all 3 sides. (You want to get some washi tape on the front of the card and some on the back side so that this forms the seal).  Punch out your goodies and add inside. Close the 4th side with the washi tape. Finish your card by attaching any sentiments, images and embellishments you like and attach to base card.

Supplies used for the Shaker Card For You

Thanks for stopping by today and I hope you have a wonderful day!